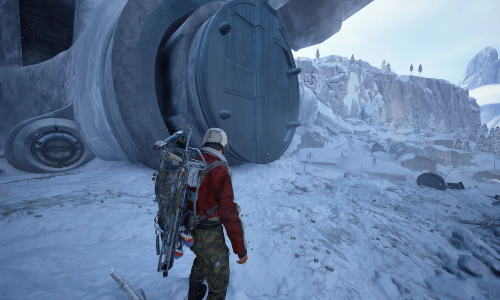
ARC Raiders Fallen Emperor Guide: Best Solo Loot Route on Pendola Pass
The Fallen Emperor is a valuable loot destination in ARC Raiders, offering materials that support weapon progression and advanced crafting. Located in Almatera Village on Pendola Pass, this massive crashed ARC machine challenges players with dangerous enemies, environmental hazards, shifting routes, and difficult platforming sections. A successful solo run depends on bringing the right equipment, using the Snap Hook efficiently, and reaching the cargo rooms without wasting time on unnecessary fights.
Preparation is essential for a productive expedition. You need an Emperor Gateway Conduit to enter the structure, enough medical supplies to handle environmental damage, and a compact loadout that leaves room for valuable loot. Understanding the main traversal mechanics and knowing which materials to prioritize will help you navigate the interior and extract with useful rewards.
How to Prepare for the Fallen Emperor
Pendola Pass unlocks after completing 25 raids. Before entering the Fallen Emperor, craft an Emperor Gateway Conduit at a Level 1 Workbench using the required materials.
The conduit recipe requires one of each of the following:
- Conductive Coupler
- Insulated Coupler
- Plated Coupler
Your loadout should focus on traversal, survival, and inventory space.
| Equipment | Purpose |
|---|---|
| Emperor Gateway Conduit | Required to access the Fallen Emperor |
| Snap Hook | Reach elevated platforms and bypass dangerous sections |
| Medical stims or bandages | Recover from environmental damage |
| Reliable weapon | Shoot yellow puzzle nodes and handle necessary encounters |
| Available backpack space | Carry valuable materials from the cargo rooms |
The Snap Hook is the most important tool for navigating the structure. Its grappling ability helps you reach upper platforms, cross hazardous sections, and avoid lengthy ground-level routes. Bring enough healing supplies for environmental damage, along with a reliable weapon for shooting puzzle targets.
Keep your loadout compact so you can collect more valuable materials during the run. Check the active map condition before deploying, too. The Redirection condition can increase the danger around the exterior, making the approach to the entrance more demanding.
Bypass Hydras and Reach the Upper Platforms
Heavily armored Hydras guard the lower corridors of the Fallen Emperor. For a solo player focused on gathering materials, bypassing these enemies can save ammunition, healing supplies, and time.
Use the Snap Hook to grapple onto the central pillars and climb toward the upper levels. Pay attention to the blue energy rings circling the pillars, as touching them can inflict significant damage and knock you back down.
Follow these movement tips to make the climb more reliable:
- Aim for stable sections of the pillars rather than the blue energy rings.
- Check your landing point before releasing the Snap Hook.
- Use elevated structures to bypass enemy-occupied corridors.
- Keep your next platform in sight so you can adjust your trajectory.
The goal is to reach the upper floors without getting drawn into unnecessary fights. Controlled grappling is more reliable than rushing toward the next platform without checking the landing area.
Solve Yellow Node Puzzles and Follow the White Lights
Environmental puzzles control access to several parts of the Fallen Emperor. One key mechanism involves small yellow nodes mounted on the walls. Shooting the required targets activates the mechanism and opens new passages.
In the route described here, destroying a cluster of eight yellow targets causes nearby walls to shift and reveal additional pathways. Since the internal layout can vary between runs, pay attention to the available openings instead of relying entirely on a memorized sequence.
Use this process to navigate the puzzle sections:
- Search the walls for clusters of yellow nodes.
- Shoot the required targets to activate the mechanism.
- Check the surrounding walls for newly opened passages.
- Follow doorways illuminated by white lights.
- Use the Snap Hook to reach elevated routes when they offer a clearer path forward.
The yellow nodes help you open new routes, while the white lights provide useful navigation cues. Combining these clues makes it easier to move through the structure without exploring every corridor.
Cross the Gas Corridor and Crushing Walls
The Fallen Emperor contains several hazards that reward quick decisions and effective use of the Snap Hook. Two major obstacles are the toxic gas corridor and the crushing-wall hallway.
Get Above the Toxic Gas
When you reach the long gas-filled corridor, look for elevated structures that provide a grappling route above the hazardous floor. Use the Snap Hook to reach the upper architecture and swing across the affected area instead of following the entire ground-level path.
Check your landing point before releasing the hook. A controlled landing allows you to continue forward without losing momentum or taking unnecessary damage.
Time Your Crossing Through the Crushing Walls
Farther inside, massive walls slam together along a narrow hallway. Recessed alcoves provide places to take cover while waiting for a safe opening, but a well-timed sprint can help you cross the exposed section more quickly.
Watch the walls’ movement and move when the path is clear. If the layout allows, use the Snap Hook to cover part of the distance. Avoid stopping in the open, and keep your next safe position in sight as you move.
Navigate the Purple Security Laser Grid
The purple laser grid guards the deeper sections of the Fallen Emperor. Contact with the beams can cause heavy damage, so plan your route before entering the room.
Use the Snap Hook to vault over dense clusters of lasers when suitable anchor points are available. Medical stims and bandages can help you recover if you take damage, but careful movement should remain your main defense.
The outer edges of the laser room may contain small containers worth checking. Prioritize those that are accessible along your route, then continue toward the cargo rooms instead of spending too much time searching exposed areas.
Keep these points in mind:
- Look for grappling points before entering the laser grid.
- Choose a route that avoids as many beams as possible.
- Keep enough healing supplies for the remaining route.
- Search nearby containers when doing so does not require a lengthy detour.
Best Loot to Collect Inside the Fallen Emperor
The cargo rooms are the main reward for completing the route. They contain materials used for weapon progression and crafting, making inventory management especially important during a solo expedition.
| Loot Item | Value |
|---|---|
| Amplification Modules | Materials for weapon amplification |
| Amplification Module Mk II | Sought-after variant for advanced weapon upgrades |
| ARC Data Modules | Useful progression and crafting resources |
| Excous Modules | Additional materials to collect during the run |
| ARC Alloy | Resource worth collecting when backpack space allows |
Prioritize materials according to your current upgrade goals. Amplification Modules and their Mk II variants deserve attention if you are progressing through the relevant weapon systems. Other materials can be valuable when they support your current crafting requirements.
To manage your backpack effectively, collect materials needed for immediate upgrades, check container contents before deciding what to keep, and avoid filling your inventory with low-priority items before reaching the main cargo rooms.
Keeping track of your ARC Raiders Coins can also help you plan your wider progression and decide which equipment upgrades deserve priority. A clear list of crafting goals makes it easier to focus each expedition on materials that support your next build.
Extract Safely from Pendola Pass
After collecting the materials you need, return to the snowy surface and locate a nearby gondola transceiver. Call in a Ballistic Gondola to complete the extraction.
Before leaving the interior, check your inventory and make sure you still have enough medical supplies for the return route. Avoid unnecessary engagements along the way, and stay focused on reaching the extraction point with your collected materials intact.
Use this short checklist before leaving:
- Confirm that you have collected your priority loot.
- Check your remaining healing supplies.
- Follow the return route while avoiding unnecessary fights.
- Locate the nearby transceiver and call in the Ballistic Gondola.
Players planning additional equipment upgrades may also consider how cheap ARC Coins fit into their broader progression plans. Keeping your goals focused on the resources and equipment you actually need can help make each successful expedition more productive.
Make Every Fallen Emperor Run Count
The Fallen Emperor rewards preparation, controlled movement, and efficient inventory management. Craft the Emperor Gateway Conduit, bring the Snap Hook, bypass the Hydras when possible, and shoot the yellow wall nodes to open new routes. Follow the white-lit doorways to navigate the interior, then use elevated paths and careful timing to cross the toxic gas corridor, crushing walls, and purple laser grid.
Prioritize Amplification Modules, Mk II variants, ARC Data Modules, Excous Modules, and ARC Alloy according to your upgrade needs. Once you have secured the materials you came for, return to the surface and use the nearby gondola transceiver to plan your extraction. A focused loadout and a clear route will help you get more value from each Fallen Emperor expedition.